
Neck Adapter for NovaVultus — Manual
This is the manual for the adapter part made specifically for [SpeQ:utako]'s mechanical head "NovaVultus". It covers the installation steps and how to operate the product inside VRChat.
Terms of Use
From 15 September 2026, the new terms of use apply.
Sangou Studio Avatar Asset Terms of Use
Until 14 September 2026, the terms below apply.
The Japanese version is the official text. Versions in other languages are reference translations.
These terms use the VN3 License template created by Hiroko Ashiyama (@hiroko_TB), VN3 License.
Important notes
1. General
- This product is a 3D model with gimmicks, for VRChat avatars.
- This is a digital download. Returns, refunds and exchanges are not available.
- Where several languages are given, the Japanese version takes precedence.
- Please read the Terms of Use and this manual before purchase, and buy only if you agree to them.
- By purchasing this product, you are deemed to have agreed to the Terms of Use and this manual.
- The contents, specifications, price and manual of this product may change for improvement or updating.
- If the Terms of Use are changed, the new text and the date it takes effect will be announced in advance.
- Damage arising from installing or using this product — a broken Unity project, avatar malfunction, data loss and the like — is handled as set out in the Terms of Use.
- You may modify this product, but you do so at your own risk as regards how it then behaves.
- Conflicts with other assets may stop it working correctly. Changes to VRChat or to NovaVultus may also change or stop its behaviour in future.
- Avatars themselves, and the mechanical head "NovaVultus", are NOT included in this product.
2. Before installing
- Always back up your Unity project before you start.
- Installation requires basic knowledge of how to operate Unity.
- Installing by any method other than the steps in this manual may stop it working correctly.
3. Problem reports and enquiries
- Accepted only through the BOOTH message function.
- When reporting a problem, please include the versions of the required assets, the avatar you are using, the tools in your project, and the gimmicks on your avatar.
- We cannot answer questions about how to use or modify tools and applications, or about compatibility and combination with other assets and tools.
- We cannot promise to fix everything. Thank you for your understanding.
- Environments other than the tested environment, environment-dependent problems, mistakes in the installation steps, misconfiguration, version mismatches, and conflicts with other assets are outside support.
- We cannot answer enquiries or problem reports about the features and behaviour of NovaVultus or of VRChat itself.
Required assets
- Mechanical head part "NovaVultus" [3D model outfit / accessory]🔗https://utako3.booth.pm/items/5665503
- Modular Avatar🔗https://modular-avatar.nadena.dev/ja
- lilToon🔗https://booth.pm/ja/items/3087170
- Avatar Optimizer🔗https://booth.pm/ja/items/4885109
- On some avatars, Remove Mesh By Mask is used to stop the mesh poking through. A dedicated texture is included for those avatars.
Installation
1. Back up your project
- Take a backup of the project you are going to work in.
2. Prepare the project
- Import the required assets.
- Import the unitypackage "NeckAdapter_NV_Main_XXX". XXX is the version number.
- Import the unitypackage "NeckAdapter_NV_(avatar name)".
3. Disable the avatar parts you will not use
- Select the avatar's head, hair and so on.
- Turn off the checkbox in the Inspector.
- Set Tag to EditorOnly. * EditorOnly stops them being uploaded, so unnecessary textures are not included in the avatar.

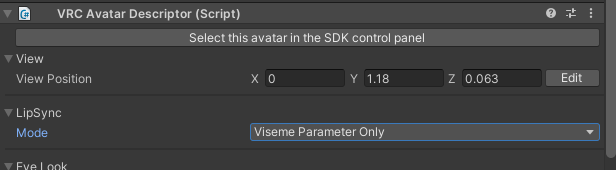
4. [ IMPORTANT ] Set up lip sync
Note: if you skip this, your avatar can no longer be built.
- Select the avatar's root object.
- In VRC Avatar Descriptor / LipSync / Mode, choose Viseme Parameter Only from the dropdown.
5. Stop the neck poking through
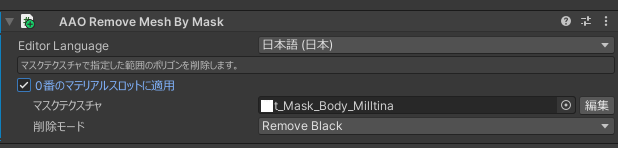
- If the folder SangouStudio/Argments/NeckAdapter/for_NovaVultus/Variants/(avatar name) contains a texture named "t_Mask_Body_(avatar name)", that avatar needs this setting. If there is no such texture, go on to "Place the Prefab". Example: Milltina.

- Select the object that holds the body's skinned mesh. Example: Body_base
- In the Inspector, use Add Component to add AAO Remove Mesh By Mask.

- Turn on "Apply to material slot 0".
- Assign "t_Mask_Body_(avatar name)" to "Mask Texture". Example: Milltina.
6. Place the Prefab
- Place the Prefab directly under the avatar. It is named "NeckAdapter_NV_(avatar name)" and sits in SangouStudio/Argments/NeckAdapter/for_NovaVultus/Variants/(avatar name).
7. Customise NovaVultus
- NovaVultus's Prefab "Mecha_Head_Set" is placed automatically inside the object "PUT_MechaHead_HERE" within the Prefab you just placed.
- Inside "Mecha_Head_Set", select the objects you want to use.
- Turn on the checkbox in the Inspector.
- Set Tag to Untagged.

- Check that the objects you are not using have their Inspector checkbox off and their Tag set to EditorOnly.

8. Copy the NovaVultus material settings
- Select "m_NeckAdapter_NV_Sample_LT" in Assets/SangouStudio/Augments/NeckAdapter/for_NovaVultus/Materials.
- Open the dropdown from the gear icon to the right of the emission settings in the Inspector and click "Copy".
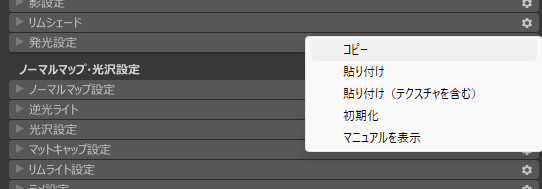
- Select the material of the NovaVultus body (the mechanical head base), such as SpeQ_MechaHead_Base_A.
- Open the dropdown from the gear icon to the right of the emission settings and click "Paste (including textures)".
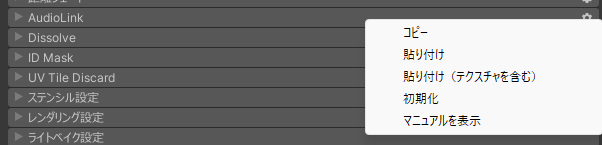
- Copy and paste the AudioLink settings in the same way.
9. Test your avatar
- Always check the behaviour with Build Type "Build & Test Your Avatar" before you upload.
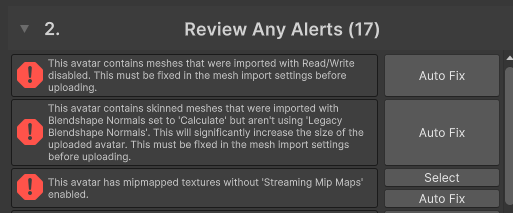
- If the error below appears in the VRChat SDK tab and the avatar cannot be built, run Auto Fix.
Operating it in VRChat
1. Turning the voice-driven blinking on and off
- Switch it on and off from ExMenu, NeckAdapter/Vox Pulse.
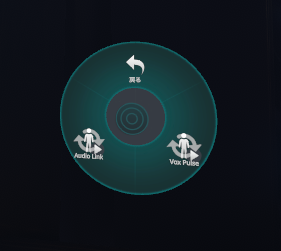
2. Turning AudioLink on and off
- Switch it on and off from ExMenu, NeckAdapter/AudioLink.
Update history
| Date | Version | Change |
|---|---|---|
| 2026/9/1 | Announced the change to the terms | |
| 2025/12/30 | 1.0.2 | Fixed a problem |
| 2025/12/30 | 1.0.0 | Released |